
Connecting a device to Assistant requires building a Smart Home Action.
Smart Home Actions rely on Home Graph, a database which logically represents the home and its devices: to keep it short, home has many rooms and there are one or more devices in every room.
Devices are defined by type and traits: device type (e.g: “light”) states the kind of commands which can be used with a particular “thing” while traits define “thing”’s capabilities (e.g: “OnOff”). Traits can be freely associated for every device, so developers are allowed to define a light with a timer trait.
In this project you will develop a smart action local to control a Lolin ESP8266 board led light. More in depth, you will develop:
- cloud fulfillment for the smart home Action with cloud functions
- a web app to monitor and control board state online
- a local app which will be executed on smart speakers/smart displays to identify devices and execute commands, communicating over WiFi LAN network (note: you will need a smart device, like a Google Home or a Nest in order to see all the following work!)
The theory behind
Local Home SDK can handle smart home intents locally with a local app (written with Javascript or Typescript) containing the business logic. Google Home or Google Nest devices load and run that app so the communication is carried in the LAN, with an improvement in latency and reliability.
When users configure the device, they get authenticated to your cloud infrastructure using OAuth2 so the Assistant can use a token and send a SYNC to receive the device list along with capabilities for a particular user. After receiving the list, Local Home platform searches for those devices in the LAN with mDNS, UDP broadcast or UPnP and sends an IDENTIFY intent to know if the device is locally controllable. If it is so, Google Home or Nest device will locally fulfill the EXECUTE intent rather than sending it to the cloud.
Command control are sent from the local app to device via application-layer protocols (e.g: HTTP, TCP or UDP).
Cloud fulfillment is used if local execution fails.
Modifying the starter project
You will start by cloning and finishing this codelab project:
git clone https://github.com/googlecodelabs/smarthome-local.git
and making some changes to make it work with a single light (it will be the led on your LoLin ESP8266 board).
This project includes cloud functions (app-start\functions), the local app (app-start\local) and the online web app (app-start\public) sources.
Modifying cloud functions
First, you will modify the app.onSync cloud function body in app-start\functions\index.js file in order to return a list with a single locally controllable ("otherDevicesIds") light-trait device:
app.onSync((body) => {
return {
requestId: body.requestId,
payload: {
agentUserId: '123',
devices: [{
id: 'light',
type: 'action.devices.types.LIGHT',
traits: [
'action.devices.traits.OnOff',
],
name: {
defaultNames: ['My Light'],
name: 'Light',
nicknames: ['Light'],
},
deviceInfo: {
manufacturer: 'Acme Co',
model: 'acme-light',
hwVersion: '1.0',
swVersion: '1.0.1',
},
willReportState: true,
attributes: {},
// Add otherDeviceIds for local execution
otherDeviceIds: [{
deviceId: 'deviceid123',
}]
}],
},
};
});
You will also adapt the "updatestate" function in order to reflect a new realtime database structure, now arranged for a single light with an OnOff status. To be more precise, you will name that database property 'light' instead of 'washer'.
exports.updatestate = functions.https.onRequest((request, response) => {
firebaseRef.child('light').update({
OnOff: {
on: request.body.on,
},
});
return response.status(200).end();
});
Modifying public web app
Now on to the public web app. This app was originally designed to work with a simulated washer device and to setup a washer key-value realtime database.
You will make some updates in index.html and main.js, in order to change key value to reflect the light device status and to update the interface for a single (simpler) OnOff light status.
<html lang="en">
<head>
    <meta charset="utf-8">
    <meta http-equiv="X-UA-Compatible" content="IE=edge">
    <meta name="description" content="Demonstrates how to control ESP8266 with Google Assistant">
    <meta name="viewport" content="width=device-width, initial-scale=1.0">
    <title>Smart Home Codelab (with a real light!)</title>
    <!-- Material Design Lite -->
    <link rel="stylesheet" href="https://fonts.googleapis.com/icon?family=Material+Icons">
    <link rel="stylesheet" href="https://code.getmdl.io/1.1.3/material.blue_grey-orange.min.css">
    <script defer src="https://code.getmdl.io/1.1.3/material.min.js"></script>
    <link rel="stylesheet" href="main.css">
</head>
<body>
    <div class="demo-layout mdl-layout mdl-js-layout mdl-layout--fixed-header">
    <!-- Header section containing title -->
        <header class="mdl-layout__header mdl-color-text--white mdl-color--light-blue-700">
            <div class="mdl-cell mdl-cell--12-col mdl-cell--12-col-tablet mdl-grid">
                <div class="mdl-layout__header-row mdl-cell mdl-cell--12-col mdl-cell--12-col-tablet mdl-cell--8-col-desktop">
                    <h3>
                        <i class="material-icons">home</i> Smart Home Codelab (with a real light!)
                        <button class="mdl-button mdl-js-button mdl-button--icon" id='request-sync'>
                            <i class="material-icons">refresh</i>
                        </button>
                    </h3>
                    <h3 class='user-welcome-heading' id='user-welcome'></h3>
                </div>
            </div>
        </header>
        <main class="mdl-layout__content mdl-color--grey-100">
            <div class="mdl-cell--16-col mdl-cell--16-col-tablet mdl-grid">
                <div id="demo-light" class="demo-card-square mdl-card mdl-shadow--2dp" style="display:none;">
                    <div class="mdl-card__title mdl-card--expand">
                        <h2 class="mdl-card__title-text">Smart Light</h2>
                    </div>
                    <div class="mdl-card__supporting-text">
                        <h4 id='light-id'>id 'light'</h4>
                        <div id='demo-light-onOff-main'>
                            <label id="demo-light-onOff" class="mdl-switch mdl-js-switch mdl-js-ripple-effect" for="demo-light-onOff-in">
                                <input type="checkbox" id="demo-light-onOff-in" class="mdl-switch__input">
                                <span class="mdl-switch__label">Is On</span>
                            </label>
                        </div>
                        <br>
                    </div>
                    <div class="mdl-card__actions mdl-card--border">
                        <a id="demo-light-update" class="mdl-button mdl-button--colored mdl-js-button mdl-js-ripple-effect">
                            Update
                        </a>
                    </div>
                </div>
            </div>
        </main>
    </div>
    <!-- Import and configure the Firebase SDK -->
    <!-- These scripts are made available when the app is served or deployed on Firebase Hosting -->
    <!-- If you do not serve/host your project using Firebase Hosting see https://firebase.google.com/docs/web/setup -->
    <script src="/__/firebase/4.8.1/firebase-app.js"></script>
    <script src="/__/firebase/4.8.1/firebase-auth.js"></script>
    <script src="/__/firebase/4.8.1/firebase-database.js"></script>
    <script src="/__/firebase/init.js"></script>
    <script src="main.js"></script>
</body>
</html>
In main.js there are some unused statuses for a light and you will comment those out, taking also care to change washer references to light ones:
'use strict';
// Initializes the SmartHome.
function SmartHome() {
    document.addEventListener('DOMContentLoaded', function() {
        // Shortcuts to DOM Elements.
        this.denyButton = document.getElementById('demo-deny-button');
        this.userWelcome = document.getElementById('user-welcome');
        // Bind events.
        this.updateButton = document.getElementById('demo-light-update');
        this.updateButton.addEventListener('click', this.updateState.bind(this));
        this.light = document.getElementById('demo-light');
        this.requestSync = document.getElementById('request-sync');
        this.requestSync.addEventListener('click', async () => {
            try {
                const response = await fetch('/requestsync');
                console.log(response.status == 200 ?
                    'Request SYNC success!' : `Request SYNC unexpected status: ${response.status}`);
            } catch (err) {
                console.error('Request SYNC error', err);
            }
        });
        this.initFirebase();
        this.initLight();
    }.bind(this));
}
SmartHome.prototype.initFirebase = () => {
    // Initiates Firebase.
    console.log("Initialized Firebase");
};
SmartHome.prototype.initLight = () => {
    console.log("Logged in as default user");
    this.uid = "123";
    this.smarthome.userWelcome.innerHTML = "Welcome user 123!";
    this.smarthome.handleData();
    this.smarthome.light.style.display = "block";
}
SmartHome.prototype.setToken = (token) => {
    document.cookie = '__session=' + token + ';max-age=3600';
};
SmartHome.prototype.handleData = () => {
    const uid = this.uid;
    const elOnOff = document.getElementById('demo-light-onOff');
    //const elRunCycle = document.getElementById('demo-washer-runCycle');
    //const elStartStopPaused = document.getElementById('demo-washer-startStopPaused');
    //const elStartStopRunning = document.getElementById('demo-washer-startStopRunning');
    firebase.database().ref('/').child('light').on("value", (snapshot) => {
        if (snapshot.exists()) {
            const lightState = snapshot.val();
            console.log(lightState)
            if (lightState.OnOff.on) elOnOff.MaterialSwitch.on();
            else elOnOff.MaterialSwitch.off();
            /*if (washerState.RunCycle.dummy) elRunCycle.MaterialSwitch.on();
            else elRunCycle.MaterialSwitch.off();
            if (washerState.StartStop.isPaused) elStartStopPaused.MaterialSwitch.on();
            else elStartStopPaused.MaterialSwitch.off();
            if (washerState.StartStop.isRunning) elStartStopRunning.MaterialSwitch.on();
            else elStartStopRunning.MaterialSwitch.off();
            */
        }
    })
}
SmartHome.prototype.updateState = () => {
    const elOnOff = document.getElementById('demo-light-onOff');
    //const elRunCycle = document.getElementById('demo-washer-runCycle');
    //const elStartStopPaused = document.getElementById('demo-washer-startStopPaused');
    //const elStartStopRunning = document.getElementById('demo-washer-startStopRunning');
    const pkg = {
        OnOff: {
            on: elOnOff.classList.contains('is-checked')
        },
        /*RunCycle: { dummy: elRunCycle.classList.contains('is-checked') },
        StartStop: {
        isPaused: elStartStopPaused.classList.contains('is-checked'),
        isRunning: elStartStopRunning.classList.contains('is-checked')
        }*/
    };
    console.log(pkg);
    firebase.database().ref('/').child('light').set(pkg);
}
// Load the SmartHome.
window.smarthome = new SmartHome();
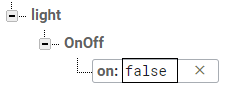
If everything is ok, clicking "update" on this page will change the realtime database to a simpler one:
Modifying the local app
You will now modify app-start\local\index.ts to handle the local intents. Studying this file and examining the codelab, you will notice two major facts (even before examining the virtual device code!):- the identification step is done via UDP, so the device should expose an UDP server itself to be able to reply to the IDENTIFY.
- the local web app just routes EXECUTE intent commands to device via HTTP on port 3388 with a POST request, so it is pretty clear that device will expose an HTTP server on the same port and should be ready to process POST requests as well.
/// <reference types="@google/local-home-sdk" />
import App = smarthome.App;
import Constants = smarthome.Constants;
import DataFlow = smarthome.DataFlow;
import Execute = smarthome.Execute;
import Intents = smarthome.Intents;
import IntentFlow = smarthome.IntentFlow;
const SERVER_PORT = 3388;
interface IWasherParams {
    on ? : boolean,
        start ? : boolean,
        pause ? : boolean,
}
class LocalExecutionApp {
    constructor(private readonly app: App) {}
    identifyHandler(request: IntentFlow.IdentifyRequest):
        Promise < IntentFlow.IdentifyResponse > {
            //Implement device identification
            console.log("IDENTIFY intent: " + JSON.stringify(request, null, 2));
            const scanData = request.inputs[0].payload.device.udpScanData;
            if (!scanData) {
                const err = new IntentFlow.HandlerError(request.requestId,
                    'invalid_request', 'Invalid scan data');
                return Promise.reject(err);
            }
            const localDeviceId = Buffer.from(scanData.data, 'hex');
            const response: IntentFlow.IdentifyResponse = {
                intent: Intents.IDENTIFY,
                requestId: request.requestId,
                payload: {
                    device: {
                        id: 'light',
                        verificationId: localDeviceId.toString(),
                    }
                }
            };
            console.log("IDENTIFY response: " + JSON.stringify(response, null, 2));
            return Promise.resolve(response);
        }
    executeHandler(request: IntentFlow.ExecuteRequest):
        Promise < IntentFlow.ExecuteResponse > {
            // Implement local execution
            console.log("EXECUTE intent: " + JSON.stringify(request, null, 2));
            const command = request.inputs[0].payload.commands[0];
            const execution = command.execution[0];
            const response = new Execute.Response.Builder().setRequestId(request.requestId);
            const promises: Array < Promise < void >> = command.devices.map((device) => {
                console.log("Handling EXECUTE intent for device: " + JSON.stringify(device));
                // Convert execution params to a string for the local device
                const params = execution.params as IWasherParams;
                const payload = this.getDataForCommand(execution.command, params);
                // Create a command to send over the local network
                const radioCommand = new DataFlow.HttpRequestData();
                radioCommand.requestId = request.requestId;
                radioCommand.deviceId = device.id;
                radioCommand.data = JSON.stringify(payload);
                radioCommand.dataType = 'application/json';
                radioCommand.port = SERVER_PORT;
                radioCommand.method = Constants.HttpOperation.POST;
                radioCommand.isSecure = false;
                console.log("Sending request to the smart home device:", payload);
                return this.app.getDeviceManager()
                    .send(radioCommand)
                    .then(() => {
                        const state = {
                            online: true
                        };
                        response.setSuccessState(device.id, Object.assign(state, params));
                        console.log(`Command successfully sent to ${device.id}`);
                    })
                    .catch((e: IntentFlow.HandlerError) => {
                        e.errorCode = e.errorCode || 'invalid_request';
                        response.setErrorState(device.id, e.errorCode);
                        console.error('An error occurred sending the command', e.errorCode);
                    });
            });
            return Promise.all(promises)
                .then(() => {
                    return response.build();
                })
                .catch((e) => {
                    const err = new IntentFlow.HandlerError(request.requestId,
                        'invalid_request', e.message);
                    return Promise.reject(err);
                });
        }
    /**
     * Convert execution request into a local device command
     */
    getDataForCommand(command: string, params: IWasherParams): unknown {
        switch (command) {
            case 'action.devices.commands.OnOff':
                return {
                    on: params.on ? true : false
                };
                /* case 'action.devices.commands.StartStop':
                return {
                isRunning: params.start ? true : false
                };
                case 'action.devices.commands.PauseUnpause':
                return {
                isPaused: params.pause ? true : false
                }; */
            default:
                console.error('Unknown command', command);
                return {};
        }
    }
}
const localHomeSdk = new App('1.0.0');
const localApp = new LocalExecutionApp(localHomeSdk);
localHomeSdk
    .onIdentify(localApp.identifyHandler.bind(localApp))
    .onExecute(localApp.executeHandler.bind(localApp))
    .listen()
    .then(() => console.log('Ready'))
    .catch((e: Error) => console.error(e));
Porting the virtual device to the real device
Codelab includes a virtual device: you will study the code and port it to C++ Arduino dialect.As you can see, the device in /virtual-device/server.js is just a node.js UDP/HTTP server.
const SERVER_PORT = 3388;
// Create a washer device
const virtualDevice = new Washer(argv.projectId);
// Start the UDP server
const udpServer = dgram.createSocket('udp4');
udpServer.on('message', (msg, rinfo) => {
    logger.info(`Got [${msg}] from ${rinfo.address}`);
    if (msg != argv.discoveryPacket) {
        logger.info(`The received message is not the same as expected magic string [${argv.discoveryPacket}]`);
        return;
    }
    udpServer.send(argv.deviceId, rinfo.port, rinfo.address, () => {
        logger.info(`Done sending [${argv.deviceId}] to ${rinfo.address}:${rinfo.port}`);
        logger.info(
            `Check console logs on your device via chrome://inspect.`);
        logger.info(
            `You should see IDENTIFY intent response with verificationId set to ${argv.deviceId}`);
    });
});
udpServer.on('error', (err) => {
    logger.error(`UDP Server error: ${err.message}`);
});
udpServer.on('listening', () => {
    logger.info(`UDP Server listening on ${argv.discoveryPortOut}`);
});
// Outbound port for Home device = the port the smart home device should
// listen to
udpServer.bind(argv.discoveryPortOut);
// Start the HTTP server
const server = express();
server.use(express.json());
server.post('/', function(req, res) {
    logger.info(JSON.stringify(req.body, null, 2));
    virtualDevice.state = req.body;
    res.send('OK');
});
server.listen(SERVER_PORT,
    () => logger.info(`Device listening on port ${SERVER_PORT}`));
The washer object take care of notifying the state change to the cloud or to update it directly:
constructor(projectId) {
    this.reportStateEndpointUrl = `https://${projectId}.firebaseapp.com/updatestate`;
    this._state = {
        on: false,
        isRunning: false,
        isPaused: false,
    };
    this.reportState();
}
/** ... **/
/**
 * Publish the current state to remote endpoint
 */
reportState() {
    axios.post(this.reportStateEndpointUrl, this._state)
        .then((res) => {
            logger.info('Report State successful');
        })
        .catch((err) => {
            logger.error(`Report State error: ${err.message}`);
        });
}
Porting the source above will end up with something like the following code:
#include <ESP8266WiFi.h>
#include <WiFiClient.h>
#include <ESP8266WebServer.h>
#include <WiFiUdp.h>
#include "ArduinoJson.h"
#include <ESP8266HTTPClient.h>
const char * wifi_ssid = "";
const char * wifi_password = "";
ESP8266WebServer server(3388);
WiFiUDP Udp;
unsigned int localPort = 3311;
// buffers for receiving and sending data
char packetBuffer[UDP_TX_PACKET_MAX_SIZE + 1]; //buffer to hold incoming packet,
char ReplyBuffer[] = "deviceid123"; // a string to send back
#define LED_BUILTIN 2
void setup() {
    Serial.begin(115200);
    Serial.println();
    setupWifi();
    startWebServer();
    startUdpServer();
    startPin();
}
void startUdpServer() {
    Serial.printf("UDP server on port %d\n", localPort);
    Udp.begin(localPort);
}
void startPin() {
    pinMode(LED_BUILTIN, OUTPUT); // Initialize the LED_BUILTIN pin as an output
    digitalWrite(LED_BUILTIN, HIGH);
}
void setupWifi() {
    delay(10);
    Serial.print("Connecting to ");
    Serial.println(wifi_ssid);
    WiFi.begin(wifi_ssid, wifi_password);
    while (WiFi.status() != WL_CONNECTED) {
        delay(500);
        Serial.print(".");
    }
    randomSeed(micros());
    Serial.println("");
    Serial.print("WiFi connected at IP address: ");
    Serial.println(WiFi.localIP());
}
void startWebServer() {
    server.on("/", HTTP_ANY, handleRoot);
    server.begin();
    Serial.println("SERVER BEGIN!!");
}
void handleRoot() {
    Serial.println("handleRoot!");
    Serial.println(server.arg("plain"));
    StaticJsonDocument < 200 > doc;
    deserializeJson(doc, server.arg("plain"));
    // {"on":false}
    bool led_on = doc["on"];
    String led_on_s = doc["on"];
    if (led_on) {
        digitalWrite(LED_BUILTIN, LOW);
    } else {
        digitalWrite(LED_BUILTIN, HIGH); // Turn the LED off by making the voltage HIGH
    }
    WiFiClient client;
    HTTPClient http;
    Serial.println("HTTP Client Started…\n");
    http.begin("https://<PROJECT-ID>.firebaseapp.com/updatestate", "46 F2 E8 99 89 6D 93 C2 44 E0 44 22 D0 86 9B F2 56 A7 7C 95"); //HTTP
    http.addHeader("Content-Type", "application/json");
    int httpCode = http.POST(server.arg("plain"));
    Serial.printf("[HTTP] POST… code: %s\n", http.errorToString(httpCode).c_str());
    http.end();
    server.send(200, "text/html", "OK");
}
void loop() {
    server.handleClient();
    // if there's data available, read a packet
    int packetSize = Udp.parsePacket();
    if (packetSize) {
        Serial.printf("Received packet of size %d from %s:%d\n (to %s:%d, free heap = %d B)\n",
            packetSize,
            Udp.remoteIP().toString().c_str(), Udp.remotePort(),
            Udp.destinationIP().toString().c_str(), Udp.localPort(),
            ESP.getFreeHeap());
        // read the packet into packetBufffer
        int n = Udp.read(packetBuffer, UDP_TX_PACKET_MAX_SIZE);
        packetBuffer[n] = 0;
        Serial.println("Contents:");
        Serial.println(packetBuffer);
        // send a reply, to the IP address and port that sent us the packet we received
        Udp.beginPacket(Udp.remoteIP(), Udp.remotePort());
        Udp.write(ReplyBuffer);
        Serial.println(ReplyBuffer);
        Serial.println(Udp.remoteIP());
        Serial.println(Udp.remotePort());
        Udp.endPacket();
    }
}
You can upload the code to the board using Arduino Ide and check the UDP/HTTP messages with the serial window:

Giving voice commands such as "Ok Google, light Light" will cause the led to light up and the remote status to update with a POST:

And here it is the final result!
No comments:
Post a Comment